

Minimum Required Version: Expert 4.10.39.R
Expert provides the flexibility of customizing the edit and menu command bar.
By adding a text file “custom.mnu” in the folder in the Expert executable file, /Silvaco/lib/expert/4.10.39.R/x86-nt/ on windows or /Silvaco/lib/expert/4.10.39.R/x86_64-linux/ on Linux 64 bits, the user can add to the content of the default tool bar settings.
These new submenu items can execute JavaScript commands or procedures and can also be assigned to keyboard shortcuts.
1.0. Preliminary steps to start example
- Place “custom.mnu” file in the folder of the Expert executable
- Run the Expert application
- Load “mux4.eld” project and open “TEST” cell
You are now ready to test any commands from the custom menu.
1.1. Setup of the custom.mnu file
Figure 1
illustrates the default menu bar of Expert.
Figure 2
illustrates how the menu can be customized to each user in order to facilitate and speed up the layout editing process.
The custom.mnufile was created in order to modify the menu bar as shown above.
The syntax of this file can be explained as follows:
- 10, 11, 12 are the position in Expert’s main menu of these new submenu items.
- The > character marks the beginning of a submenu.
- The < character marks the end of a submenu.
- The submenu may be nested as illustrated in the line starting with “> Via”
- “> &Routing” shows how to define the name (Routing) of a submenu and its keyboard shortcut (Alt-R).
- Many JavaScript commands, separated by a semicolon, can be listed. P1M1 = box(-1,-1,12,12,”Poly”); box(0,0,10,10,”Metal1″); box (4,4,2,2,”Contact”); zoom;
1.2. Mix of script languages
Expert currently supports two scripting languages: Lisa and Javascript. This second custom.mnu file illustrates the use of both languages within the same file.
It is important to note the use of “// SCRIPTLANG = JS” and “! SCRIPTLANG = LISA” lines to indicate the language of the commands to execute. This entry is valid for all following commands until another language indicator is listed in the file.
The line Wordpad &2 = spawn (“C:/WinNT/notepad.exe”); is an example of calling other Windows program from within Expert.
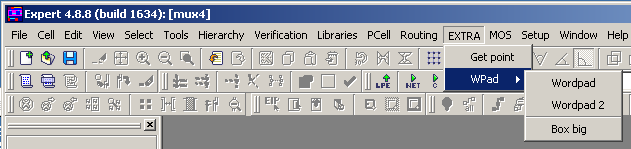
Figure 3
illustrates the custom menu derived from the file shown in this section.
1.3: Setting shortcut to a new submenu
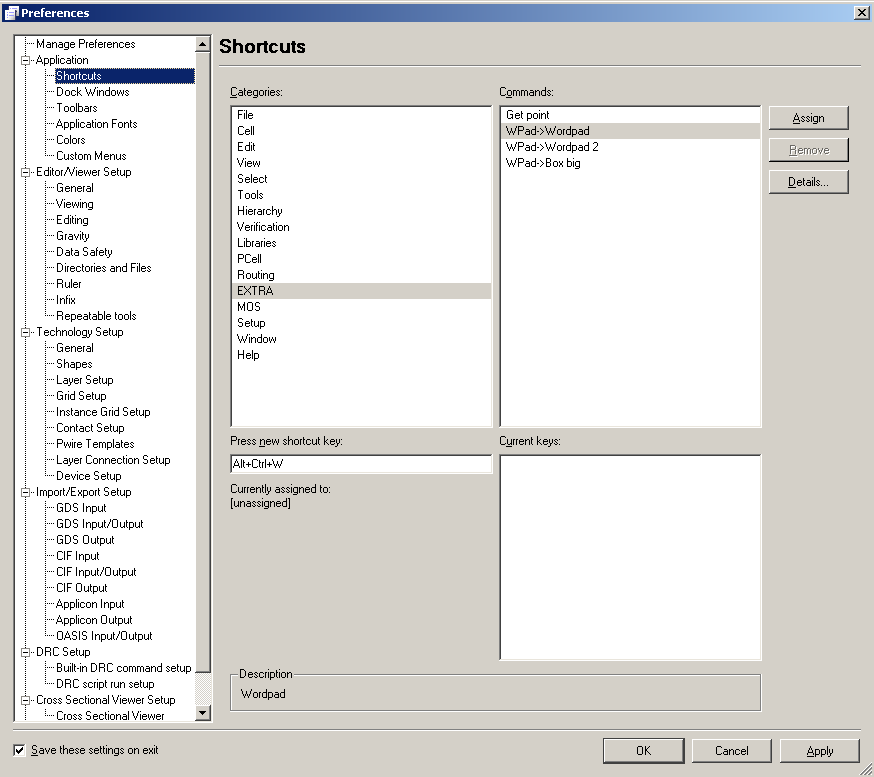
Each menu item can be assigned to a shortcut in order to facilitate the layout task. The menu Setup->Shortcuts->Setup opens the Expert Preferences window
.
The user can select the categories EXTRA, then the command to execute (Wpad>Worpad) and specify the desired combination of key to launch this command.
If this combination is already in use, the tool will indicate that it is currently assigned to another menu item. The combination Alt+Ctrl+W as shown above, was not used by any other menu, therefore the tool indicates that it is currently “unassigned”.
Pressing the “Assign” button located in the upper right corner of the window will accept the setting for this shortcut.
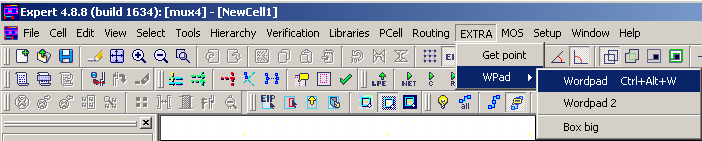
The shortcut will then appear in the menu item as shown in Figure 5
.
For more details about the different LISA or JavaScript commands and procedures, see Chapter 17: “Expert Interface Scripts (XI-Shell)” of the Expert manual and/or following PDF expertapi_ref1.pdf (located in the “<Silvaco_install_dir>/lib/expert/4.10.39.R/docs/” folder).
Graphics


These examples are for reference only. Every software package contains a full set of examples suitable for that version and are installed with the software. If you see examples here that are not in your installation
you should consider updating to a later version of the software.
Input Files
js_custom.mnu
10 > 	&Routing
	// SCRIPTLANG = JS
	Pol&y            = setLayer("Poly");
	Met&1            = setLayer("Metal1");
  	Met&2            = setLayer("Metal2");
      > Via
       P1M1      = box (-1, -1, 12, 12, "Poly"); box (0, 0, 10, 10, "Metal1"); box (4, 4, 2, 2, "Contact"); zoom;
       M1M2      = box (0, 0, 10, 10, "Metal1"); box (2, 2, 6, 6, "Metal2"); box (4, 4, 2, 2, "Via"); zoom;
      <
   <
11 > &TEST
	// SCRIPTLANG = JS
	GetPoint      = pointUI();
   <
12 > MOS
    // SCRIPTLANG = JS
     Pmos            = box(0, 0, 5, 3, "P-Act"); box(2, -1, 1, 5, "Poly");
     Nmos             = box(0, 0, 5, 3, "N-Act"); box(2, -1, 1, 5, "Poly");
   <
jslisa_custom.mnu
10 > 	&Routing
	// SCRIPTLANG = JS
	Pol&y            = setLayer("Poly");
	Met&1            = setLayer("Metal1");
  	Met&2            = setLayer("Metal2");
      > Via
       P1M1      = box (-1, -1, 12, 12, "Poly"); box (0, 0, 10, 10, "Metal1"); box (4, 4, 2, 2, "Contact"); zoom;
       M1M2      = box (0, 0, 10, 10, "Metal1"); box (2, 2, 6, 6, "Metal2"); box (4, 4, 2, 2, "Via"); zoom;
      <
   <
11 > EXTRA
     ! SCRIPTLANG = LISA
	Get &point      = get_point();
   > WPad
	&Wordpad      = spawn("C:/WinNT/notepad.exe") /nowait;
	Wordpad &2    = spawn("C:/WinNT/notepad.exe");
	-----------
	// SCRIPTLANG = JS
        &Box big      = box(0, 0, 1000, 1000); zoom();
   <
   <
12 > MOS
    // SCRIPTLANG = JS
     Pmos            = box(0, 0, 5, 3, "P-Act"); box(2, -1, 1, 5, "Poly");
     Nmos             = box(0, 0, 5, 3, "N-Act"); box(2, -1, 1, 5, "Poly");
   <